Pages

Wednesday, May 29, 2013

Decorative Vegetable and Herb Planter

I love planting in containers, because you can place them where ever a situation needs colour, or to maximize sunny areas in the garden.

Why plant just flowers? This year, instead of planting the usual annual assortment, we decided to fill this decorative container brimming with veggies and herbs.
36 inch concrete trough
First, we removed about a third of last year's soil and...

replenished it by adding 1/2 of composted sheep manure and....
 1/2 of black earth. Mixed thoroughly with the existing soil that had perlite. It's necessary to have vermiculite or perlite; this encourages proper drainage and root development. Otherwise the soil becomes hard and roots struggle.

We started by planting the tomatoes and their supports. These are heirloom and beefsteak tomatoes. The supports are somewhat unsightly at first, but once tomatoes arrive, the tomato foliage will camouflage the stakes.


Our desire was mainly for culinary purposes, but colour and texture was also considered.
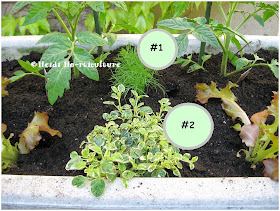
#1  Dwarf Dill (12-20" tall)
#2  Variegated Oregano (trailer)


#3 Curly Red Lettuce
#4 Bright Lights Swiss Chard
#5 Dark Little Leaf Lettuce
(repeated on the left side)

We didn't over plant - spaced for adequate growth. However, there is still enough room, if one wishes to plant some annuals, in case one misses summer blooms. ;)

Will update on the growth and colouration. Can't wait to harvest too!
Our desire is to harvest every plant from this container, so it benefits the kitchen, our tummies and it'll have less waste going into the compost come autumn.

Update: here

Tuesday, May 21, 2013

Ants on Peony Flower Buds

One question I get asked every year: How can I get rid of the ants on my peony flower buds?


Some years, I've seen flower buds so full of ants, you could hardly see the bud.


Answer:  DON'T!

This is a common occurrence. I have heard there is a direct correlation to buds opening because the ants eat the sappy, sugary coating that the bud petals exude. Not sure this is the case, as I've seen peony buds open successfully without ants on them (for example, at the garden centre). At any rate, it's VERY common and the ants don't harm the flower buds.

Photo from years ago... sniff, sniff - my old garden.
Conclusion:  Don't worry about ants. Just admire their harvesting technique and embrace the peony season with hopefully an extended bloom time. Last year's warmth made the bloom season rather short. They withered quickly in the heat...

Wednesday, May 15, 2013

Boxwood Leaf Miner - Monarthropalpus flavus


My eyes were drawn to my small Korean Boxwood yesterday. This variety is called "Green Gem". I bought it 3 years ago. It had some winter snow (weight) damage on it earlier this spring, but something else caught my attention.

Seeing these brown blisters frustrates me.
Tucked inside these blisters is a creature called: 
Monarthropalpus flavus - Boxwood Leaf Miner

As you can see, pretty much all the leaves have blisters in various stages of  the leaf miner's life cycle.

Here, I brought a stem inside to reveal what's inside each blister pocket. 


The adult leaf miner lays eggs, by inserting them between the layers of the boxwood leaf. Making a perfect pocket situation for their offspring to hatch, become pupae and begin feeding.

Here you can see the small puncture hole mark, 
where the adult laid the egg. This hole becomes the exit for when they pupate into adults.

Some leaves have 3-4 miners munching away. Getting ready to become adults.

On the shiny, upright part of the leaf, you see more browning and damage. Holding this up to the light will reveal the pupae, its excrement and the ever enlarging pocket they create.
These photos show pupae that are orange, this means they are near ready to transform themselves into adults. The pupae are lighter in colour when young - more yellow. Once they become orange, this is the time they stop feeding and go through their next life cycle. Through the puncture "window" or hole, they will squeeze through, hang from upside down until they pupate into an adult - orange fly.

This is an insect that is hard to control, unless you cut back the blistered portions of the boxwood ruthlessly or if you use pesticides. Systemic insecticides would help me combat this insect, but for such a small plant and for the sake of spraying chemicals, I choose not to in this case. In Ontario, one would require a pesticide license to acquire such chemicals to do the trick.

Since this is a young boxwood, I have decided to take it out of my garden. If I prune it back hard, it will take a long time to recover and my garden is too small to waste space. Last year the leaf miner numbers were unnoticeable to me. Perhaps I purchased this boxwood with leaf miners or perhaps not. Best rid this boxwood before it feeds off my other plants.

So sad.... Time for something else in that spot.

Have a look at my post on the adult-life-cycle of this Leaf Miner.

Monday, May 06, 2013

Don't Throw Away Broken Clay Pots - Part 2

In my previous post on broken clay pots, I recommended not throwing them out. If you're like me, and many others, perhaps this has happened to you this spring:


Not to worry, there are plenty of uses if you have the will to use them elsewhere.

You can use broken pots as garden art - allowing plants to spill out from their brokenness. It's quite interesting, and I will do a post on that method soon...

For now, this weekend, we made a path to the compost heap with all the broken bits that were saved over the years.

First, it was decided that this worn area should have a permanent path made with aggregates. Shade from a Black Walnut and Silver Maple back there has made growing grass difficult.  Crushed clay chips are ideal for this.
I used rags to wrap the broken sections and a sledgehammer -smashing the clay pots into 1 inch bits. 
(Make sure you don't smash and damage the surface beneath.)  
Never do this on patio stones.
Various sizes are the best. They help level and fill in gaps better.
I went through several rags accomplishing this. The impact shreds the material quickly.
If you have an intended area, use dark plastic to first kill off any grass or stubborn weeds before laying down the clay bits. It takes about 2 weeks with this plastic cover to kill off most everything. 
Make sure you way down the edges, so no light and moisture get through.
Next, level off the intended path area. 
Remove ruts, high-low areas and remove any roots from neighbouring plant material. 
Level the path down to about a 1 inch depth, so that the clay bits won't be too high off the ground.
If you like to suppress more weeds and grass from growing through the broken clay, use landscape fabric or this old pond liner. It will help keep the weeds down.
I made the path slightly wider, and it's ok to overlap this fabric to create the desired shape. 
You don't have to use landscape fabric. We used it, since Convallaria majalis (Lily of the Valley) is situated on the left.

Once I crushed a bucket full, I spread it over the landscape fabric. 
I just tamped it down with foot traffic, but you could roll it with an aggregate roller to make the chips embed in the soil.

I had a hunch there was enough to cover the entire path...

Here is the finished result.  Now, whenever another pot breaks, we can easily crush and top-up or refresh the path. Great waste diversion.